ADOBE PAGEMAKER

PageMaker – What is PageMaker?
PageMaker is a desktop publishing software that is used to design and create documents that we can print.
PageMaker is a type of software that is used to create newspapers, graphics, e-books, visiting cards, banners, posters and other printing designs.
In other words, “PageMaker is a computer program using which we can make magazines, newspapers, wedding cards, books, banners and posters.”
PageMaker is mainly used for designing and performing graphics related tasks.
It is a popular tool of computer system which is also used by big companies to create advertisements.
In this, whatever material the user creates, he can print it through the printer. In a page maker, the user gets many types of tools using which he can design things.
Whenever we talk about page maker, the most popular name among them is Adobe PageMaker.
This page maker was developed by Aldus Corporation in 1985. But in 1994 it was purchased by Adobe company.
PageMaker Versions :- It has the following versions:-
1. Aldus PageMaker 1.0 was first released for the Macintosh in July 1985 and for the IBM PC in December 1986.
2. Aldus PageMaker 1.2 was released in 1986 and added system support for PostScript Fountain.
3. Aldus PageMaker 2 was released in 1987.
4. Aldus PageMaker 3 was released in April 1988 for the Macintosh and Aldus PageMaker 3 was released in May 1988 for personal computers.
5. Aldus PageMaker 4 was released in 1990 for the Macintosh.
6. Aldus PageMaker 5.0 was released in January 1993.
7. Adobe PageMaker 6.0 was released in 1995.
8. Adobe PageMaker 6.5 was released in 1996.
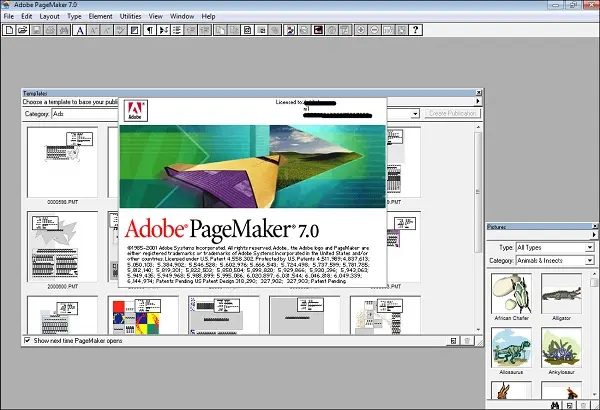
9. Adobe PageMaker 7.0 was released on July 9, 2001.
Who created Page Maker?
Aldus PageMaker 5.0 was released in January 1993. Adobe PageMaker 6.0 was released in 1995, a year after Aldus Systems acquired Aldus Corporation.
How to download Page Maker?
Follow the steps given below:-
1. Download PageMaker – First of all, download Adobe Page Maker by searching from Google.
2. Install PageMaker – Download and install it now.
3. Open PageMaker – Now you can open it and use it.
How to open PageMaker?
Start > All Programs > Adobe > Adobe PageMaker 7.0
Or Open Run and type PM70 and click OK.
Advantages of PageMaker:-
1. A page maker has the facility of template, due to which designing graphics becomes even easier.
2. In Page Maker, the user can design things as per his wish.
3. Page Maker has many types of tools which help the user in creating a creative design.
4. It has the facility of tool bar due to which the user can store or save documents and files in the computer.
5. In this the user can also color the document or files.
6. Page Maker helps in enhancing the creativity of the user.
7. Through modern printing technology in Page Maker, we can do printing on both sides, duplex printing, binding printing in less time and easily.
Disadvantages of PageMaker:-
1. Some people have to face a lot of problems in using Page Maker.
2. It does not support spreadsheet.
3. It provides bad HTML source code.
Components of PageMaker:-
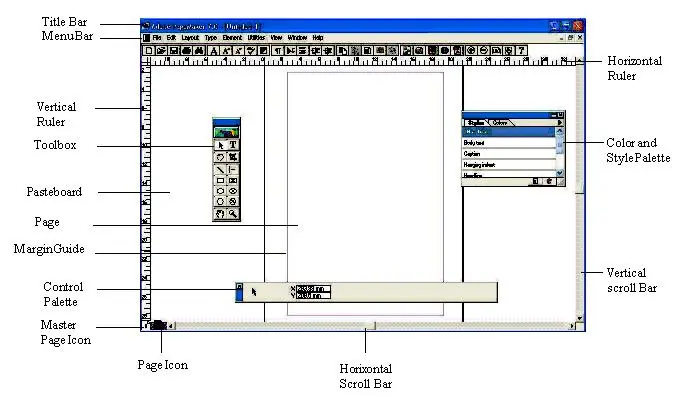
1. Title Bar:- Title Bar is the topmost part of PageMaker . Through this we can enter the name of the document and save it. If you have not saved the name of your document, the name untitled-1 will appear on the title bar.
2. Rulers:- There are two types of rulers in a page maker which can be rotated vertically and horizontally. It is used to measure the length and width of a page or document.
3. Pasteboard:- Pasteboard is a type of tool that is the background behind Page Maker. This tool is used to place text and graphics. Text and graphics cannot be printed on pasteboard.
4. Page Icon:- The page icon is a tool that represents a page in PageMaker . This helps the user to know which page he is working on or viewing at that time. It contains many icons (such as – new, open, save, print etc.). We can use them as per our need.
5. Margins:- Margin is used to present the dotted line. All text and graphics are placed within the page margins.
6. Page Boundaries:- It represents the edges of the paper. All designs are within the page boundaries and no document can be designed outside it.
7. Toolbox:- Page Maker contains a tool box that contains a variety of tools that help users create graphics and documents.
8. Scroll Bars:- It is used to move pages.
9. Resize Box:- It is a tool used to change the size of the window.
10. Previous Size (refresh) Box:- his tool is used to refresh the screen display.
Toolbox:-
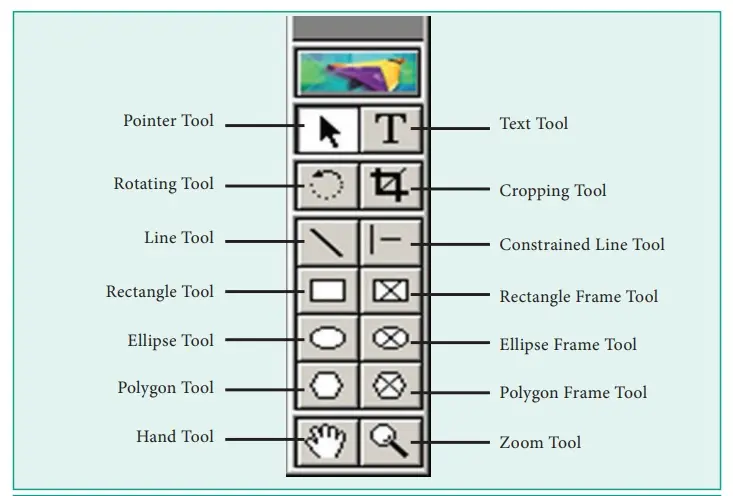
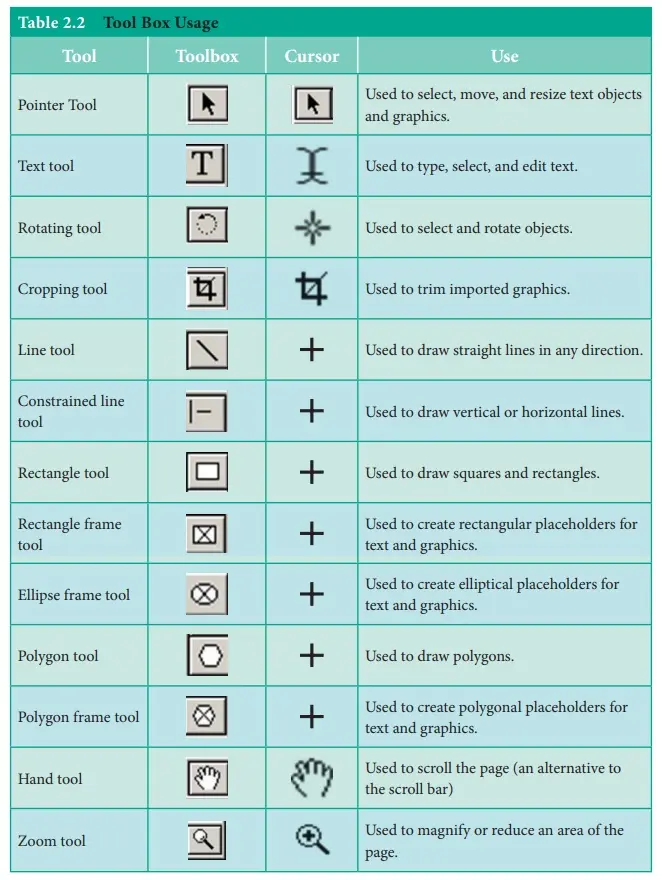
1. Pointer/Selection tool
To select any type of object on a page, such as text, line, box, circle, picture, etc., bring the mouse pointer right above that object and click. Handles appear around the selected object, with which you can It turns out that the object is selected.
You can also select more than one object simultaneously by using this tool, for this first select one object by clicking and then hold down the shift key while clicking other objects one by one, this will select all those objects. If the objects to be selected are close together, then activate the pointer tool and draw an imaginary square circle around them with the mouse pointer, this will select all the objects going inside that circle. To remove any selected object from the selection, press Shift and move it. Click Click any empty space to cancel all selections.
2. Text Tool
This tool lets you type text into your publication or select already typed text. Using the text tool you can select and modify text, as well as insert text boxes. Can.
To insert text, click the text tool, then click the document and start typing text.
3. Rotating Tool.
This tool is used to rotate a selected object by 360 o by a difference of 0.01o. For this, first select that object using the pointer tool, then click on the rotating tool. With this, the shape of the mouse pointer will change to a square star-like shape. Now move the mouse pointer to the point of the selected object, considering it to be the center and you want to rotate it. Press and hold the same mouse button and point in the direction in which you want to rotate it. Draw a line from that point by dragging the mouse pointer in the same direction. When you rotate that line, the selected object will also appear to rotate. After rotating +it to the desired degree, release the mouse button, this will rotate the object to the same extent. Taxes will become stable.
4. Crop Tool
Using this you can trim the imported image to any size as per your wish. You can use this PageMaker tool only on .tiff images.
5. Line Tool
Through the line tool, you can add lines of any angle in PageMaker.
If you want to make the line inclined at intervals of 45 o, then press and hold the Shift key while dragging the mouse pointer.
6. Oblique Line Tool
Using this you can create straight lines at an angle. Click the Oblique Line tool, and then click the document. Drag it in the desired direction to create a line.
7. Constrained Line tool
This tool is used to draw horizontal and vertical straight lines. To draw a line, first click this tool. Due to which the mouse pointer will take the form of a plus + sign. Now press the mouse button and drag the mouse pointer from one point to another. Due to which a horizontal or vertical straight line will be formed between those two points. You can create the effect of this tool by holding down the Shift key while using the Line tool. You have to use this tool to draw 45 degree angle and vertical horizontal lines.
8. Rectangle Tool
This tool is used to create rectangular and square shapes. To draw a rectangle, first click this tool, which will make the mouse pointer form a plus + sign. Now hold down the mouse button and drag the mouse pointer from one corner of the rectangle to the other corner opposite to it. Due to which a rectangle will be formed between those two points. To create a square, the shift key is pressed while dragging the mouse pointer in the above process.
9. Box Tool
Using the box tool you can create rectangular shapes. Select the box tool and click on the document. Drag it to create a rectangle.
10. Circle Tool (Ellipse/Circle Tool)
Using the Circle tool you can create a circular or elliptical shape. Select the circle tool, and then click on the document. To create a circle or ellipse, drag it, an ellipse will be formed. To create an ellipse, the Shift key is held down while dragging the mouse pointer.
11. Ellipse Tool
This tool is used to create elliptical and circular shapes. To draw an ellipse or oval, first click this tool, which will cause the mouse pointer to form a plus + sign. Now hold down the mouse button and drag the shape of the mouse pointer from one corner to the other corner opposite to it. So that an oval
or
12. Circular Frame Tool
Using the circular frame tool, you can create a circular or elliptical text box in which you can also type text.
Select the Circular Frame tool, and then click on the document. Drag it to create a circular frame. Select the Text tool from the toolbox and click inside the frame. Type your text. The text will be limited inside the box.
13. Ellipse Text Box
To draw circular or oval shaped text boxes in PageMaker , you can use Ellipse Text Box just like the ellipse tool.
14. Polygon Tool
You can create such a shape using the polygon tool. Which has more than four corners. Select the Circular Frame tool, and then click on the document. Drag it to create a polygonal frame. To make changes to the Polygon, click on the Element and then select Polygon Settings from the drop down menu.
15. Polygon Text Box
You can create a text box in polygon tools.
16. Hand Tool
This tool is used to move any page of a publication around or up and down on the screen so that you can see the desired part of it.
17. Zoom Tool
Zoom feature is available in almost every program today. You can use this tool given in PageMaker to see the graphics in detail by zooming in or out on the screen.
Menu Bar:-
Understand each option of File Menu (Alt + F)
All the options of File Menu are used to perform tasks like creating, editing, opening, saving, printing etc.
• Open Ctrl + O is used to open any shared file.
• Recent Publications is used to open recently used or created files.
• Close Ctrl+W is used to close any publication.
• Save Ctrl + S is used to save any publication safely on the hard disk.
• Save As Shift+Ctrl+S is used to save the publication in another format or in another place and with another name.
• Revert: After opening any publication, if something goes wrong while making changes in it or something gets deleted, then by doing Revert it will become like new.
• Place Ctrl+D is used to import any file into PageMaker .
• Acquire of Bitmap jpg in this program with High Resolution If you want to take any image in any PMD document through any scanner camera, then select the file menu option and after selecting, insert the image through the Acquire option. May go.
• Export is used to export any type of PMD file to various types of PDF, webpage and graphic related files.
• Link Manager Use Shift+Ctrl+D to display the contents of any BMP and JPG files brought to the document.
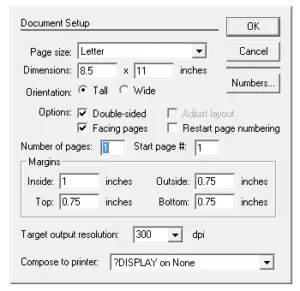
• Document Setup Shift+Ctrl+D Use to set the size, margin gesture and page numbering of any inserted page as per your choice.
• Printer Style: Through this the print style is set.
• Print Ctrl+P Through this any PMD file is printed.
• Preference>General Use to display any inserted JPG and BMP files in high resolution according to the printer DPI on any PMD document.
• Send Mail is used to send the currently open publication to someone else by electronic mail.
• Exit Ctrl+Q Through this, PageMaker is closed.
1. Understand each option of Edit Menu
• UNDO Ctrl+Z is used to go back one step.
• Cut Ctrl +x
• Copy Ctrl + C is used to copy any text or photo and make a duplicate.
• Paste Ctrl+V is used to paste the cut or copied matter through paste.
• Clear (Del) is used to erase any selected object text by clearing it.
• Select All Ctrl+A is used to select all types of photos, text objects and complete publication.
• Deselect All Shift+Ctrl+A Use to deselect any selected text, photos or objects.
• Paste Multiple is used to paste any cut or copied matter in multiple steps. In this, you can create copy in multiple layers and can also set its distance.
• Paste Special: Any photo object or text can be copied from any other software and pasted in PageMaker by setting the format with the help of Paste Special.
• Insert Object: Through this, we use it to insert any object, plain text, barcode, calendar or any Excel, PowerPoint file from any other software.
• Edit Story Ctrl + E is used to type any document through this and after typing, click on Edit Layout. On clicking, the cursor will change to text cursor. As soon as you click, your text will appear on the page. Will become visible.

2. Understand each option of Layout Menu
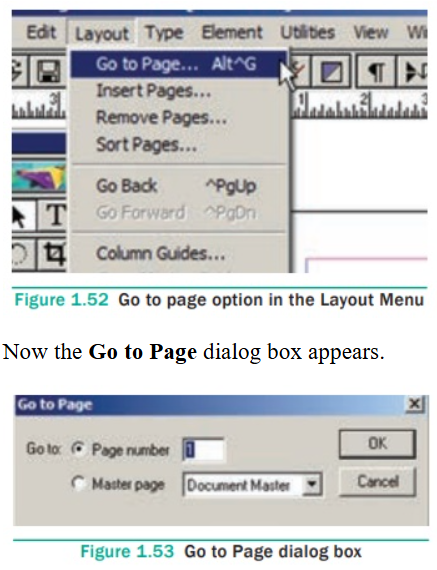
• Go to Page Alt+Ctrl+G Use Go to Page to go to any page.
• Insert Pages: When one or more pages are to be taken, then click on Insert Pages, add the number of pages and then click on Insert, the page will be inserted.
• Remove Pages Use Remove Pages to delete one or more pages.
• Sort Pages is used to view all the pages inserted with the help of Sort Pages in a dialog box so that you can go to that page by clicking on any page and then clicking OK.
• Go Back (Ctrl+PageUp) /Go Forward (Ctrl+PageDown) When multiple pages have been inserted, you can change the page with the help of Go Back, Go Forward. For its shortcut, you can use Page Up, Page Down.
Column Guides By default, a margin is set in PageMaker . If you want multiple margins, then you can set them with the help of column guides and you can also set your distance in it.
• Copy Master Guides: Once the column guides are moved, they are restored to their place by clicking on Copy Master Guides.
• Auto Flow is like a dropdown, after ticking it, whenever you move your head to any menu, it will open automatically.
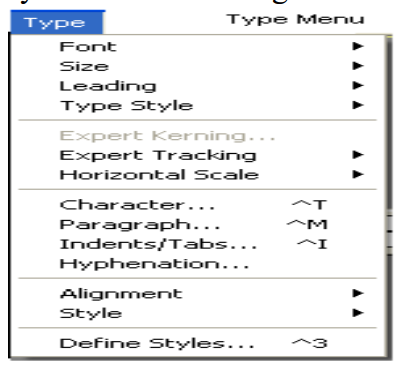
3. Understand each option of Type menu
• Font: It is used to change the by default font, for example the default font is Times New Roman. Which can be changed and another font can also be used.
• Size: Used to change the font size.
• Note- Leading/Expert Kerning/Expert Tracking/ Horizontal Scale. The function of all these is used only to increase or decrease the space, in this Expert Kerning increases the character spacing, similarly Expert Tracking also increases but it increases the spacing according to the word. Leading is used to increase or decrease the line spacing of a paragraph.
Leading points are used to give line spacing of any paragraph.
Expert kerning is used to provide character spacing in any selected words and sentences. Expert tracking uses this to loosen the spacing title by measuring the distance between two or more words.
Horizontal scale is used to set the character spacing in any paragraph and in a loose motion up or down from the normal mode and can also set the first line indent.
Indent/tabs:- These are mostly used to set any paragraph and first line indent through the ruler bar.
High definition: Used to connect words like sleeping on a journey or under a graph in any sentence.
• Type Style: Type Style is used to make text normal, bold, italic etc.
• Character Ctrl+T is used to set character specification.
• Paragraph Ctrl+M: Using this, you can use paragraph specifications like paragraph spacing alignment, dictionary, etc.
• Indents/tab Ctrl+I is used to place indents according to the ruler. It can also be called tab.
• Hyphenation: When a paragraph line is filled, it breaks and comes to the next line. At that time, a small dash is placed on the word that is cut, which is called hyphenation.
• Alignment is used to set the alignment.
• Style: With its help you can apply options like Normal, Heading, Subheading to your text.
• Define Style Ctrl+3 With its help you can create your own text style like heading, subheading, etc.
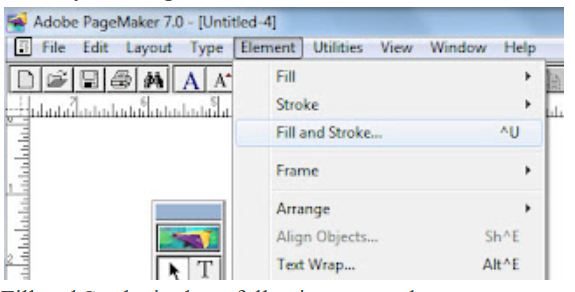
4. Understand each option of Element Menu
• Fill: This option is used to fill solid color pattern in any object created with the help of this option.
• Stroke: This option is used to make the outline of any shape thick, thin and to change its color.
• Fill and Stroke (Ctrl+U) By opening both the above options in the same dialog box, you can use both fill and stroke and can also fill the color as per your choice.
• Frame is used to place a frame in any drawn shape. The function of the frame is to insert (place) the image inside the shape.
• With the help of Arrange option, it is used to arrange any object in which that object is used to send it back to bring it to plant.
• Align Objects(Shift+Ctrl+E) is used to align two or more objects together.
• Text Wrap (Alt+Ctrl+E) You must have read this option in Microsoft Word, Text Wrapping, its functionm is also the same, wrapping text of any image file or any object.
• Group(Ctrl+G) is used to group two or more papers or text.
• Ungroup (Shift+Ctrl+G) is used to ungroup any grouped shape or text.
• Lock Position(Ctrl+L) option is used to lock the position of any shape or text so that the shape or text cannot move from that place.
Unlock(Alt+Ctrl+L) is used to unlock a locked shape or object.
Mask (Ctrl+6) / Unmask (Shift+Ctrl+6) Just as masking is used in Photoshop, similarly masking and
unmasking are used in PageMaker also.
• Image is used to give Photoshop effects on the inserted image and to view the CMS (Color
Management System) settings.
• Polygon Settings: With its help you can increase the number of polygons of the polygon tool i.e. you
can increase its angle.
• Rounded Corners: With its help you use the Rectangle tool to make the corners into round shapes.
• Link Info is used to see the information i.e. location of the inserted image file, from where in our
computer this file has been taken like desktop, my picture etc.
• Link Option Information about the inserted image file like what is the name of the file and what is its
extension.
• Non-Printing: After selecting any object image or text and clicking on non-printing, it will not be
printed out at the time of printing.
• Remove Transformation is used to remove the transformation of an image or object after rotating it
and return it to its original state.
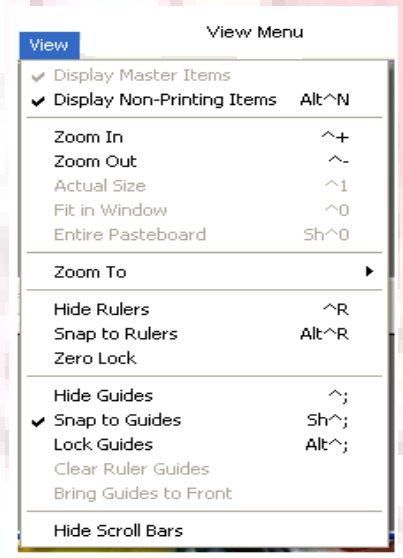
5. Understand each option of View Menu
You all know the meaning of View, options related to it are available in this menu, like which option you
want to show and which option not, you can set it from here.
• Display Master Items The function of this option is used only to show and hide the items of the master
page.
• Display Non-Printing Items (Alt+Ctrl+N) This option is used to show or hide non-printing text or items.
• Zoom In (Ctrl++) is used to enlarge the PageMaker document.
• Zoom Out (Ctrl+-) is used to zoom out the PageMaker document.
• Actual Size (Ctrl+1) is used to view the actual pixels of the PageMaker document.
• Fit in Windows (Ctrl+0) is used to view the PageMaker document by fitting it on the screen.
• Entire Pasteboard (Shift+Ctrl+0) Used to minimize the PageMaker document and view the
pasteboard.
• Zoom To: This option is used to view a selected object by zooming it full screen.
• Hide Rulers(Ctrl+R) This option is used to hide the ruler bar.
• Snap To Rulers (Alt+Ctrl+0)
• Zero Lock
• Hide Guides (Ctrl+;) is used to hide and show the applied guides.
• Snap to Guides (Shift+Ctrl+;)
• Lock Guides (Alt+Ctrl+;) is used to lock the placed guides so that they cannot move from their place.
• Use Clear Ruler Guides to remove multiple applied guides at once.
• Send Guides to Back is used to send the applied guides to the back of the document.
• Hide Scroll Bars Used to hide and show horizontal and vertical scroll bars.
6. Understand each option of Window Menu
In this, the function of the menu is only to bring and hide the dialog box, hide the tools, hide the control
panel etc.
• Arrange Icon is used to arrange icons among all the options given in PageMaker . This option does not
work in any computer.
• Tile This is the view style. Open Publication i.e. PageMaker is used to view the document in tile style.
Tile style divides open publications into equal sizes.
This style works similarly to the Cascade tile but looks slightly different in the preview. One is mounted on top of the other in cascade style.
• Hide Tool The function of this option is to hide and bring the tool box.
• Hide Control Palette is used to hide and bring the control panel in PageMaker .
• Show Colors: With the help of this option, we use to hide and bring the color box.
• Hide Style is used to hide and bring the dialog box with pre-made style like Headline, Subhead etc. in PageMaker .
• Hide Layer: This option is used to hide and bring the layer dialog box.
• Show Master PageThis option is used to hide and bring back the Master Page dialog box.
• Show Hyperlinks This option is used to hide and bring up the Hyperlinks dialog box.
• Just as Plug-in Palettes are used to hide all the options, this option also works in the same way. Five options are given inside it which can be hidden and shown.
• Untitled-1 This name is showing the name of the document, if instead of this you save it with your publication name then the name is shown. Its function is nothing, it just shows us which publication is open and the sign tick means work is being done on it. If many pages are open apart from this, thethe list of all will be visible and the one on which work is being done will be ticked.
7. Understand each option of Help Menu
With the help of this option you can take any kind of help.
• Registration: Used to view the serial key and details etc. of the registered user.
• Adobe Online: Used to get any help online with the help of Adobe Online and now this feature has been discontinued.
• About PageMaker : Inside this you can read some information about PageMaker , which is used to get information like which version is installed in PageMaker , which serial key is entered, whose name is written in the registration etc.